
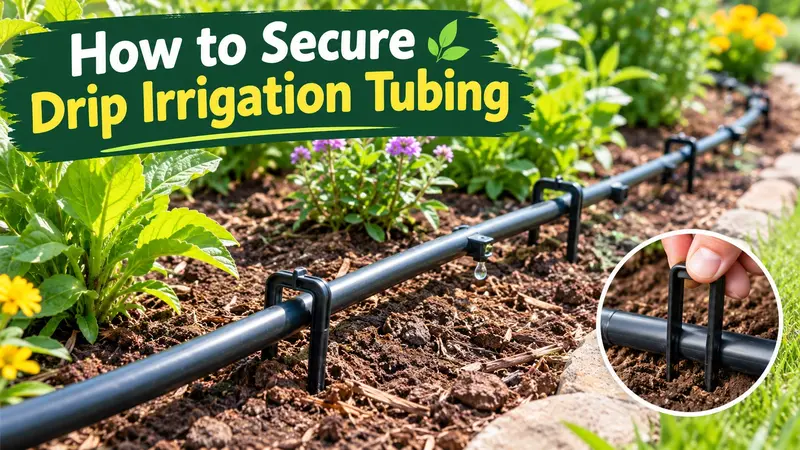
Freshly unrolled drip tubing rarely stays exactly where you put it. It curls back toward the shape it held on the roll, shifts across loose soil, lifts through mulch, and moves away from plants as people work around the bed. On a slope, an unsecured line can gradually move downhill. Around curves, tubing pulled too tightly can straighten itself and drag emitters away from their intended locations.
Where the tubing sits affects where water reaches the soil. EPA WaterSense describes microirrigation as a low-pressure, low-flow method that applies water directly to plant root zones and reports that these systems can use 20 to 50 percent less water than conventional sprinkler systems.
That efficiency depends partly on a thoughtful installation. Tubing that wanders across a planting bed, sits within reach of an edger, or pulls an emitter away from its intended location becomes harder to maintain and can change the area receiving water.
Before reaching for anchors, get the route right.
Step 1: Walk the Route Before Unrolling the Tubing
Start with the planting bed itself.
Identify the plants the line needs to serve and look at the open ground between them. Note edging, rocks, tree roots, pathways, retaining walls, dense planting, and places where people regularly walk or work.
Choose a route that reaches the intended watering locations without repeatedly crossing areas where people are likely to step on the tubing, edging equipment may cut it, garden tools may catch it, or routine planting may disturb it.
Think about access as well. A line tucked tightly against the base of every shrub may become difficult to inspect as the plants mature. Tubing stretched across an open gap can interfere with garden work. A route that will eventually disappear under mulch may be perfectly workable, but its general location should be easy to reconstruct later.
EPA WaterSense recommends grouping plants with similar water requirements into irrigation zones. This approach also makes physical routing easier because the tubing can follow planting areas that need a similar irrigation schedule.
Step 2: Decide What the Tubing Needs to Reach
Before securing the line, identify how water will leave it.
Some systems use point source emitters placed near individual plants. Others use dripline with emitters built into the tubing at regular intervals. A layout may also include smaller feeder tubing running from a larger distribution line to individual emission points.
Those arrangements require different routing decisions.
With point-source irrigation, the tubing must bring each emitter to a useful location within the plant’s root area. With dripline, the line’s position helps determine the water-application pattern because emitters are distributed along its length.
Avoid treating every plant stem as the automatic target. Trees and shrubs develop root systems that extend outward as they mature. Concentrating all irrigation directly against a trunk or crown may become less appropriate as the plant grows.
Leave enough flexibility in the initial route to accommodate normal plant development and routine landscape work.
Step 3: Let Coiled Tubing Relax
Tubing that has spent weeks or months coiled will naturally want to curl.
Unroll enough material for the section you are installing and lay it loosely along the proposed path. Giving the tubing time to relax makes it easier to see where it naturally wants to bend and where it may eventually need additional support.
Warm outdoor conditions can make some flexible tubing easier to handle, but follow the tubing manufacturer’s installation guidance rather than applying excessive heat or using methods that could damage the material.
Do not stretch the tubing tightly between two fixed points. Leave enough freedom for the line to settle naturally and for connections to remain free of constant pulling force.
Nothing needs to be perfectly anchored yet. Walk the route again after the tubing is on the ground. A path that looked straightforward before unrolling the line may create an awkward bend, an unnecessary crossing, or a poor approach to a plant.
Make those changes while the tubing is still loose.
Step 4: Give Curves Enough Room
Flexible tubing handles direction changes better when curves are gradual.
A tight bend can flatten or kink the tubing and restrict water flow. Even without a visible kink, forcing a sharp turn can leave enough tension in the line for it to pull against anchors or nearby fittings.
Around shrubs and trees, form broad arcs that the tubing can hold comfortably. If the line repeatedly springs away from a curve, widen the turn before adding more restraint.
One anchor should not have to fight a large amount of tension simply to preserve the shape of the route.
Where the system design requires a more abrupt direction change, a compatible fitting may be appropriate. Use components intended for the tubing instead of folding the line into a shape it cannot comfortably maintain.
Step 5: Position Everything Before Adding Anchors
Once the tubing has relaxed, work through the bed section by section.
Move the line around plants, adjust curves, and place emitters or planned emission points where they can serve the intended root areas. Check that branches and fittings approach each other naturally rather than being pulled together under tension.
You will usually need more support at:
- Changes in direction
- Sections where tubing naturally lifts from the ground
- Slopes where the line tends to move downhill
- Emitters that need to remain in a defined location
- Long runs that shift when the tubing is handled
- Areas where mulch or routine landscape work could move the line
Straight tubing resting naturally on level soil may require less restraint than a curved section on a slope.
There is little benefit in anchoring every section simply to create perfectly uniform spacing. Put support where the route actually needs it.
Step 6: Secure the Line Without Crushing It
An anchor should hold tubing at the intended grade without damaging or noticeably deforming it.
For compatible half-inch drip tubing, sod staples for tubing are one option for holding the line in position. NDS Pro offers six-inch steel sod staples designed to straddle tubing and secure it at finished grade. Its flat-top version can be pushed in by hand or carefully hammered into harder soil, while the round-top version is intended for hand insertion in softer soil. NDS also describes the staples as a way to help keep emitters near the intended plant root area.
Place the staple over the tubing, never through it. Push both legs into the soil while watching what happens to the line beneath the top of the staple.
The tubing should remain round. If an anchor visibly flattens the line, forces it against a sharp object, or creates a severe bend, pull the anchor out and reposition it.
Also pay attention to the ground. Loose soil may not hold an anchor as firmly as compact soil. Hard clay can make insertion difficult. Use an anchoring method suited to the site rather than forcing an anchor into the ground and damaging the tubing.
Step 7: Add Support Around Curves, Branches, and Emitters
Straight runs are usually easy to manage. Movement becomes more noticeable where the layout changes direction or divides.
At a broad curve, position anchors where they preserve the shape without pulling the tubing into a tighter bend. If a single anchor is carrying considerable tension, loosen the tubing and reshape the curve.
Branches need similar care. Use a tee or another fitting to connect the lines, and use nearby anchors to keep them in position. Arrange the tubing so each section approaches the fitting naturally.
Point source emitters can also shift when the tubing moves. If an emitter repeatedly drifts from its intended watering location, stabilize the nearby tubing or use an appropriate emitter support instead of placing unnecessary strain on the emitter connection.
NDS lists its sod staples for use around trees, shrubs, flower and vegetable gardens, and container plants, including applications where the line or emitter needs to remain in position.
Step 8: Pay Extra Attention to Slopes
Gravity changes how tubing behaves on a slope.
A line running across a grade can creep downhill as soil loosens, mulch shifts, people work in the bed, or the tubing moves over time. A line running downhill can place additional pull on branches and fittings if it was stretched during installation.
Where it suits the irrigation design, routing tubing along the planting area’s contours can make the physical layout easier to control. Add support where the line tends to move, rather than relying on a fixed spacing formula.
Steeper ground may require more anchoring than a level bed. Soil firmness, tubing stiffness, vegetation, mulch, and the route’s shape all affect how much restraint is needed.
Elevation also affects irrigation performance. EPA WaterSense recommends pressure-compensating drip equipment for landscapes with substantial variation in elevation, topography, or pressure. If tubing remains firmly in position but plants at different elevations receive noticeably different amounts of water, the irrigation design needs attention. Additional anchors will not correct a hydraulic problem.
Step 9: Protect Tubing From Landscape Maintenance
Pay close attention to the edges of planting beds.
Tubing placed immediately beside turf may fall within reach of string trimmers, edging tools, mower wheels, and future border changes. Moving the route farther into the planting area can provide some protection while still letting the system serve nearby plants.
Watch for foot traffic too. A shortcut between two parts of the yard may eventually become a regular walking route even if it was never designed as one. Avoid leaving tubing exposed across an obvious path.
Vegetable gardens present another situation because planting patterns can change from season to season. Position and secure tubing so routine cultivation does not constantly put it in the path of tools.
Before staking plants, installing landscape lighting, or adding new shrubs later, check where the irrigation tubing runs. Many avoidable drip line repairs start with work unrelated to the irrigation system.
Step 10: Test the Layout Before Adding Mulch
Mulch can conserve soil moisture, suppress weeds, and hide drip tubing from view. Once the line disappears, however, it becomes harder to find a poorly placed fitting or kink.
Run the irrigation before covering the installation.
Walk the entire route while the system is operating. Check fittings, emitters, curves, branches, and anchored sections. Make sure the tubing is not kinked or visibly compressed by a staple.
Watch what happens as the line fills with water. A section that looked stable while empty may twist or move slightly under operating conditions.
After testing, apply mulch based on the plants’ and landscape’s needs. Keep service points such as flush ends, filters, adjustable components, and fittings accessible enough to locate when maintenance is required.
Take a few photographs before the route disappears. Include recognizable landscape features in the images so you can tell where the tubing is located later.
Step 11: Watch the Tubing While the Zone Runs
Operate the complete zone under normal conditions and look farther than the nearest emitters.
Check for tubing that lifts, twists, shifts sideways, or pulls against a fitting as it fills. Make sure broad curves remain open and branches are not placing unnecessary tension on their connections.
Then inspect the emission points. Water should reach the soil where the plants can use it.
Continue to the farthest part of the zone. Weak or inconsistent output there does not automatically indicate a problem with anchoring. Filtration, pressure regulation, total zone demand, elevation, tubing capacity, or an obstruction may need investigation.
EPA guidance for microirrigation emphasizes proper pressure regulation, filtration, and flush-end assemblies. These components address operating conditions that physical anchoring cannot control.
Step 12: Check Where the Water Actually Went
After a representative watering cycle, inspect the soil around several plants.
Check plants near the beginning and end of the tubing run, along with any areas on a slope. An emitter can appear to be operating normally while the moisture pattern develops somewhere other than the root area you intended to water.
If the soil around a plant stays dry, you may need to adjust the emitter or tubing position. Pooling at one point calls for a closer look at emitter output, watering duration, soil conditions, and placement.
With a dripline with built-in emitters, check how moisture develops along the run rather than judging the installation by the tubing’s appearance. Judge the layout by the soil moisture it produces rather than by how evenly the tubing appears to be arranged.
Make positional adjustments while the system is still easy to reach.
Step 13: Leave Room for the Landscape to Change
Shrubs widen, trees develop larger root systems, annual beds are replanted, and vegetable gardens change from one season to the next.
Tubing and anchors may need to move with them.
Where removable anchors are appropriate, repositioning them makes future adjustments easier. NDS notes that its round-top sod staples can be removed when you need to expand or change a drip layout.
When moving an existing line, inspect the tubing before putting it back into service. Replace sections that have been crushed, badly kinked, cut, or otherwise damaged.
Emitter positions may also need adjustment as plants mature. Make those changes based on the plant, soil, and irrigation design rather than leaving the original installation untouched simply because it still operates.
Step 14: Check Tubing During Routine Irrigation Inspections
Drip systems benefit from periodic inspections while running.
EPA recommends regular irrigation checks for leaks, broken or clogged components, and other problems, and cleaning microirrigation filters when needed. Inspect tubing position during the same walk.
Look for lines that have surfaced through mulch, loose anchors, tubing pulled tight around growing plants, displaced emitters, and damage caused by tools or animals.
Pay particular attention after planting, pruning, raking, edging, or replacing mulch. These activities can move tubing without anyone noticing.
Dense vegetation can conceal problems as the landscape matures, so occasionally check the hardest-to-see sections rather than only the exposed portions of the system.
What a Finished Layout Should Look Like
Stand back from the planting bed before putting the tools away.
The tubing should follow a route that makes sense for the plants rather than wandering wherever the coil happens to fall. Curves should remain open without kinking. Fittings should sit without being pulled sideways. Anchors should hold troublesome sections in position without flattening the line.
Look closely at the bed edges, where maintenance equipment can reach the tubing; slopes, where the route is more likely to shift; and emission points, where movement can change the location receiving water.
Run the zone one final time. Watch the line fill, check the emitters, and look at the soil around several representative plants.
If the tubing remains in position, the connections stay relaxed, and water reaches the intended root areas, the physical layout is doing its job. The tubing can then remain accessible for inspection and be moved when the landscape eventually changes.
Learn More About Gardening Tips.